Okay,
the last thing is the tripod. Why didn't I just adapt
an already built tripod? Well, in the interest of making
it as versatile as possible, and keeping it as cheap as
possible, building worked much better than buying. The
downside is that by building a tripod out of steel, I
added a lot more weight. I can carry the fully setup camera
myself, but, especially if there's a camera on it, I like
to use two or three people for safety. The tripod is made
out of thin-walled 3/4 inch box tubing. I borrowed the
design off many pro tripods by doing a two box tubing
lengths sandwiching a third that can be adjsut for height
design. This allow almost limitless options in terms of
height. By putting in a ten or so foot length of tubing
in the tripod legs, I can get the camera 25+ feet tall.
Take a moment think about the production value that adds.

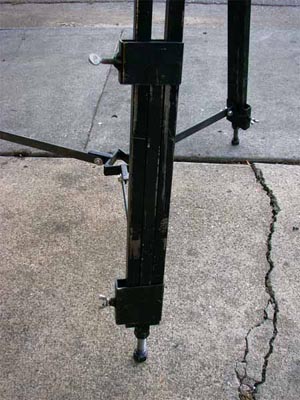
This
is how the tubing sections are sandwiched together. As
previously stated, it's all fully adjustable. It uses
the same idea behind the main counterweight system. Drill
a hole in the box tubing, weld a nut, and screw in a thumb
screw. An in all of these, I use an insert similar to
the one in the counter weight system. Obviously, this
is done for each tripod leg so there's six total.
This
is the bottom of all the legs. I welded a nut onto the
end of the center tube and threaded about a foot of all-thread
(with a nut welded on the end) into it. This is how I
fine-tune the leveling of the base. Also, if I'm trying
to get the jib arm as high as it will possibly go, I'll
back these out all the way. Note, when using the crane
in delicate areas, I gaffers tape clean rags to the feet
so no grease, dirt, rust, or paint will come off on rug/hardwood
floor/etc. Tread lightly!

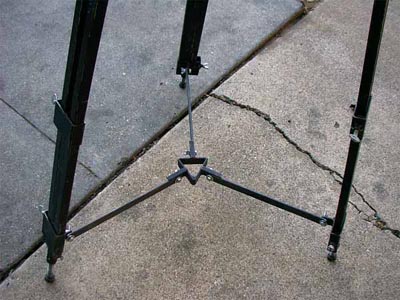
All
tripods need spreaders. They make it that much more stable
by locking everything together. By this picture you can
tell I welded tabs onto the lower tube clamps. I bolted
three equal length pieces (this is important) of steel
flat bar. The center triangle is another contraption invented
by me. By pulling (or kicking) the triangle up, the legs
fold together for transportation. If you want to set the
spreaders into the 'lock' position, step on the triangle.
I welded a small piece of flat stock onto the top of where
the spreaders attach so they will lock in an extended
position and not just fall to the ground. When on a dolly,
sand bag the spreaders. If you're not careful, it'll tip
on you if not secured properly.

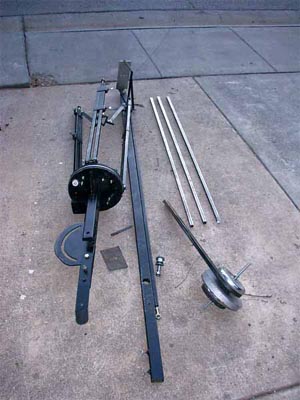
This
is all the pieces of the jib arm ready to transport or
store. The tripod is folded close and the counterweight
and arms are disconnected. I could take it apart a little
more, but this fits into most small pickups or SUVs. The
three box tubbing poles on the right are for extending
the tripod. Like I said before, you can put any length
poles in the tripod.