by
Joren Clark
I
built it out of need. I had a shot I wanted to do for
a music video and needed a jib arm or crane. Since then,
I've used it for a dozen or so projects, including professionally
for a commercial and promotional video. I designed it
by heavily researching on the Internet. I looked at all
the other designs or pictures available for free. There
are jib arm designs for sale, but I feel no one should
buy those because there are so many great free web sites
with people sharing information with others. Then I looked
at the pro models to see how they are designed. Then I
sat down and created my own design, stealing from everything
I learned from the designs available online. Don't take
my design as the end all in DIY jib arms. It was the best
for me within my means. Hopefully you can learn something
that will help you make your jib the best for you within
your means.

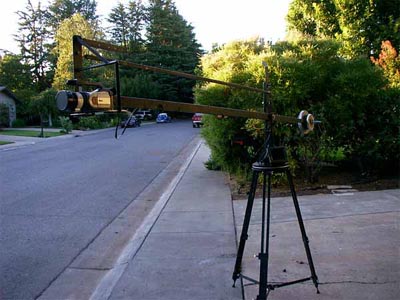
Here
it is in all its glory. I don't know if the proper name
is jib arm, boom, or crane. Like everything else in the
world, there's at least three names for this. The basis
for this design is a four-link system so no matter what
the angle of the actual arm is at, the camera "basket,"
as I call it, is always parallel with the ground. However,
I designed a way to tilt the camera up and down, so you
can get bird's eye shots that change to be low angle shots,
etc. Basically, I tried to anticipate any need I might
have of a jib arm and make it as versatile as possible.
The one think my design doesn't have is a pan feature
at the camera. My next design will.
I've
separated the main components into the tripod, the basket,
the arm with pivots and the counter weight. We'll start
with the basket and work our way back.

This
is the basket with a gl-1 in it. It's all welded together.
If you don't weld and don't know anyone who can (or don't
want to pay someone), you could just as easily make it
out of wood or another building material that you are
more comfortable in. I prefer the durability of mild steel
and welding. But there are other options. I used 2-inch
flat bar as the main piece and half-inch angle iron to
build the basket that extends off the main bar. The triangle
support piece is to make sure it didn't sag with the weight
of the camera–probably a little overkill, but who cares.
I bought a piece of plumber's gasket material (at any
hardware store) to seat the camera to the metal plate
so it wouldn't slide around. This is the cork-looking
stuff that tripods used before rubber. Then I drilled
holes in the plate and gasket and put a quarter-20 thumbscrew
up through the bottom of the plate to secure the camera.

I
love theses cheap digital cameras. It's always properly
exposed and in focus. Here you can see the thumbscrew
I use to fasten the camera. You can also see the main
bearings and bolt (overexposed on the left). I chose to
go overkill and use the largest bearing I could get that
would fit in the box tubing. My reason for this is that
it'd have less angular play, which might be a concern
since all the weight will be on one side of the bearing
set. Remember, you need bearings on both sides of the
box tubing. Don't buy expensive bearings, but also don't
buy cheap bearings that have stamped steel casings–It's
gotta be cast. The wire going back to the left is for
the field video monitor. More on this later.