Finding just the right choices in chromakey gear for you and your production is not always the easiest thing in the world to figure out on your own. It seems like every place you look there is conflicting information and confusion. Before you read this Greenscreen shootout, I would recommend that you read our “Basics of Chromakey Technology and Rules to Shoot By” article, as this will familiarize you with some of the concerns the low-budget filmmaker must face when choosing equipment, training, and post-production software.
Before we get into the actual shootout, let me offer the following disclaimer: This is not a shootout that’s told from the perspective of an industry veteran who has been doing greenscreen for his entire career. Rather, we specifically chose to compare these items from the perspective of a user who is new to chroma-keying, to show how easy they will find these products to use and how successfully they can do so with the minimal number of logical adjustments. As with all things, any program can be fiddled with and recombined by experts to achieve phenomenal results. However, most users want to know how easy and quickly they can do these things without having to fiddle with all the controls. If you happen to fall into this category, then read on and see what you think of our comments, pictures, and conclusions as it compares to your budgetary needs. All of the software has links for you to try the demo of the software out yourself, so you can see how much you agree with our conclusions.
With that said, we will explore these products in the following way: Production, Post-Production, and Improvement Tools.
Production
First, we’ll look at a few production green screens made by ImageWest . Purchasing blue or green screens from a professional company can help make sure you get optimal results on your shoot and prevents you from having to build your own.
 Huge 10 x 15 Foot In-Studio Background System – $189.99
This product is how we shot our basic greenscreen footage. It’s got a fairly decent stand that allows you to hang approximately a 10’ high greenscreen and includes a green (or blue) cloth that will then drape approximately five feet in front of the rig. (This is very useful for positioning, as your talent should be approximately 6’ in front of the screen.) Econcomical at $189, it is a decent starting kit. However, it is problematic because the muslin cloth that’s included is no thicker than a decent muslin bed sheet, which causes it to have agreater chance to have things show through the greenscreen if you don’t put a matte behind it. Additionally, it is a bit different hue than the green side of their TwistFlex Chroma-Key Background, which discourages you from using the two together. Because it is shipped folded instead of rolled, the first time you use it you will find it full of unacceptable wrinkles. Because the fabric is muslin, the only way to get rid of these seems to iron them out, which is both difficult and time-consuming. This is designed for a studio, so if you want to take this someplace to shoot with it, I highly recommend investing in a large 10’ wide tube that you can wrap the cloth around.
Final Breakdown:
Pros: Economical pricing, large coverage
Cons: Thin, easily-creaseable muslin, stand is not quite as stable as I would like
Product Website: Click Here
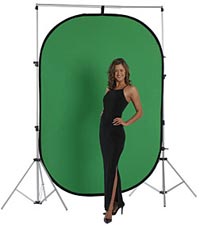
 5’ x 7’ Huge TwistFlex Chroma-Key Background – $69.99
While you have to be more creative when using this smaller greenscreen in film production, it can be quite useable if you cleverly use garbage mattes. This is especially helpful for documentary filmmakers who want to film their subjects in front of different locales. The screen comes folded into three loops sort of like many reflector discs. When you open it up, it pops into its full size. The green color on this is deeper and more saturated than the one in the standalone cloth backdrop. The opposing side is a deep blue for blue screen work, and both seem to work quite well. This can be bought by itself or with a stand. If you don’t have C-stands to hang the screen from, I would recommend picking up the stand for it, which runs $110. My only complaint with this product is that it’s extremely complicated to recollapse after you open it. (It literally has a twenty page booklet that reads like an origami training manual on how you refold the screen when you’re done.)
Final Breakdown:
Pros: Very economical pricing, blue and green screen reversibility, rich color saturation
Cons: Difficult to collapse at the end of a shoot
Product Website: Click Here