Autodesk Maya 2013
 Publisher: Autodesk
Platforms: Windows/Macintosh/Linux
Description: 3D animation package
MSRP: $3675 New, $1845 Upgrade, $6825 Creative Suite New, Free 3 year license for students
Expected Release: Available Now
Official Website: http://www.autodesk.com
Samples: http://usa.autodesk.com/maya/customers/
Demo: http://usa.autodesk.com/maya/trial/
Special Discount: N/A
Review Issue: Issue #79 (09/12)
Review By: Michael J. Muwanguzi
Final Score: 9.0
In the midst of reviewing this software, I had the unique privilege of meeting with a couple of the developers of Autodesk Maya to explain some of the thinking behind this latest installment. Most of the time, the new additions to Maya seem to answer needs on an individual basis when it comes to each discipline, be it modeling, rigging, animating, etc. This time around it’s different. Catching up with a few of the developers at this years’ SIGGRAPH, they told me about the new way of filmmaking that Lightstorm Entertainment and Weta Digital had developed during the James Cameron production of Avatar. What they discovered was a melding of pre and actual production to allow filmmakers a chance to use virtual assets to re-envision shots while on a live set. This method is called Virtual Production.

After developing the foundation of the Virtual Production pipeline, Lightstorm and Weta teamed up with Autodesk to expand on this idea by creating more tools that allowed filmmakers to view virtual content while on production and get speedy feedback of the live and/or digital content they were capturing on film. With this background understanding, it was apparent as to why all the major inclusions had a very team-oriented intention. Pretty much every aspect of Maya has had some improvements made to support this vision.
Ease of Use
Animation
The Live Character streaming is a new Send To option for animators that have the Autodesk Entertainment Creative Suite. A HumanIK character can be sent to MotionBuilder for motion capture data to be connected to it. With Live Character, that mocap data can be streamed from MotionBuilder back to the HumanIK rig in Maya so that artist’s can see the results before committing the performance to final bake. This streaming connection can be established on the same machine or over a network remotely from another computer.
The new .ATOM file format promises to expedite transferal of animation sequences and poses for use on the same character or a different character with the same rig. When exporting an .atom file, aspects like constraints, driven key animation, static values, baked animation, and animation layers can be included. Bringing them back in later, all of those elements can be applied to a character’s hierarchy, by name, or template. The character template is especially effective in that it filters through nodes and attributes to find specific targets to apply the animation to.
Nonlinear animation allows animators to stretch, condense, layer, and mix animation clips without destroying the original. The new Clip Matching tools help to match poses and align clips. The clip offset defines an offset object to manually adjust the movements in the sequence. To that end, clip ghosts can be displayed to chart the total positions of the scene animation so that the animator can adjust the character’s position as they move through the action.
The Retime Tool in the Graph Editor is another way to adjust the timing of a particular area of animation. An entire arrangement of keyframes can be selected by hierarchy and markers can then be placed throughout the sequence. Those markers can be moved to stretch out how long an area of animation will take to complete the action, compressed to shorten that time, or simply locked to be preserved. Generally speaking, it’s a very powerful ease in/ease out instrument to quickly and precisely tweak areas of movement.
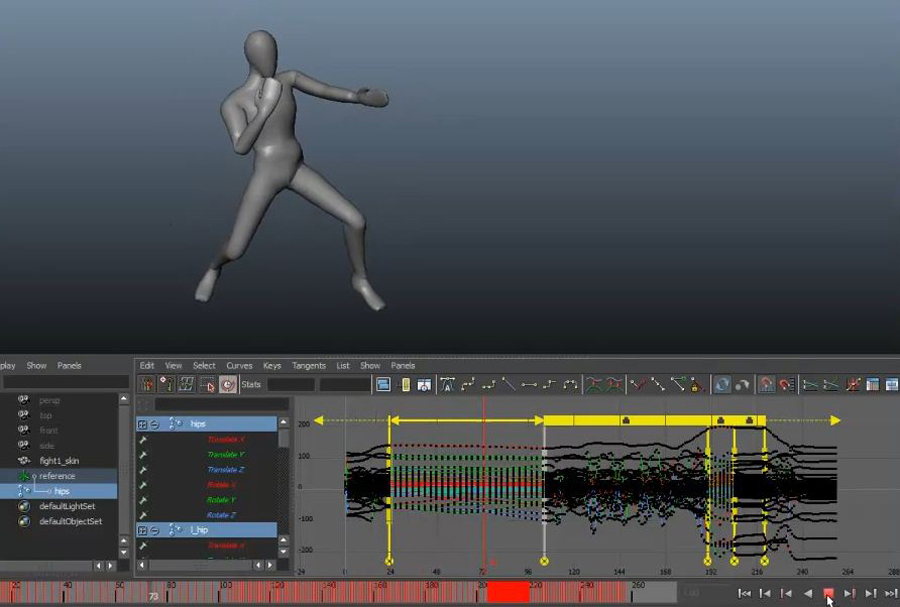
The new Retime Tool in the Graph Editor lets animators modify the timing for a group of channels and keyframes rather than on an individual basis.
Modeling
A couple of enhancements in modeling have been made to the Extrude and Sculpt geometry tools. In the previous year’s version of Maya, the extrude tool received an overhaul with the inclusion of the thickness, offset, and division interface present next to the transform tool. Rather than having to contend with a slider with a limited range of modulation, the updated interface offers values instead that are more precise than an arbitrary position on a line. Add to that a solid background color for better visibility of the values. Finally, being able to use the same Ctrl and Shift functionality to speed up and slow down the value change was brought over from the Channel Box. Having this as part of the Extrude tool really helps to make the interface independent from the old way of moving out of the viewport to make adjustments.
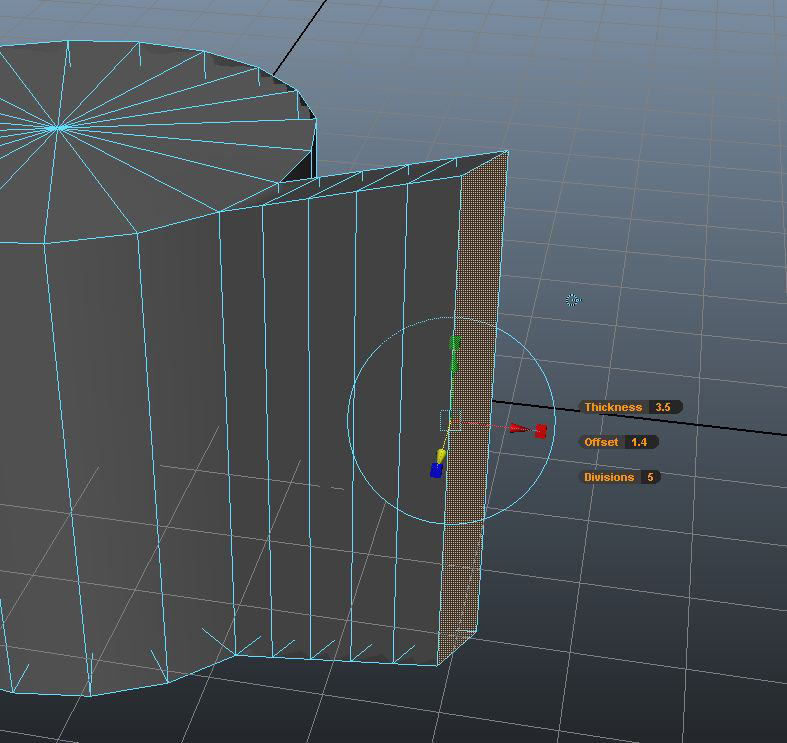
Slider controls have been expanded to accommodate more precise manipulation and visibility in the viewport.
A smaller change in the modeling section are found in the improvements made to the Sculpt geometry tool, in general, and the pinch tool in particular. The algorithm behind how the Pinch tool works has been overhauled for smoother results on nurb surfaces and polygon meshes. To further control the power of the Pinch effect, the Brush Strength slider intensifies the pinch in correlation to how long you apply the tool. This is a minor addition that could prove to be indispensable for modelers that sculpt in Maya.
Rigging
Previously, the Character Controls and HumanIK tools were separated into individual windows to set up your humanoid character. The new Start Pane begins the process for rigging by letting you choose between options for creating, defining, or importing character rig data. Working through the character controls opens up more options within tabs that are readily available at anytime. Creating a Control rig or a custom rig for streaming animation from MotionBuilder can all be arranged from within the Character Controls palette as well. With a Control Rig, artists can retarget animation by specifying a source through the Source menu.
For rigs that don’t fall perfectly within the constraints of the HumanIK, the Custom Rig tool lets you define the rig as well as the interface that it overlays. Any joints and effectors can be click assigned to positions on the visual interface. If any of the controls need to be tweaked, the Mapping Controls allow users to realign the map translations and rotations. Finally, digging into the XML files gives users another way to update the mapping by changing the listed values as well as linking a custom background image to act as a visual guide to the placement of effectors in the interface.
A new smooth bind method that offers better standard results than Closest Hierarchy and Closest Distance methods is Heat Map binding. The idea is that each joint emits weight influence much like irradiating heat. Looking at the gradient color ramp for the weights reveals the amount of influence each joint has under the new bind method. Areas of skin that are close together and need to be manually defined are far less likely than before.
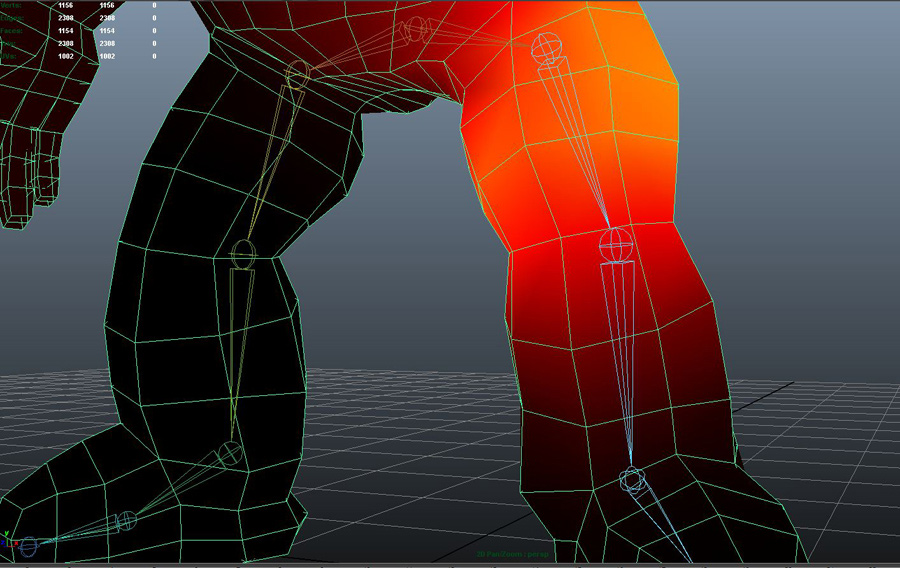
The Heat map method provides a more accurate relationship between the mesh and joints on a soft bind.
Dynamics
To bring more realism to the way hair interacts with itself and its surroundings, the Nucleus framework has now included it in the form of the Maya nHair generation system. nHair can handle a large amount of follicles, interact with each other more accurately, use nConstraints to constrain hair from other Nucleus objects, and finally, for faster playback of the simulated hair, uses nCaching. The extra bonus of adding it to the Nucleus simulation framework is that it plays nicely with other nDynamics, like Maya nCloth, Maya nParticles, and passive collision objects.
MayaBullet is an extension of the popular Bullet physics library that has powered both film and game productions. Bullet’s engine is a self-contained system that provides artists with a way to designate soft and rigid body objects and constrain their collision boundaries. The simulations that can be run within MayaBullet can later be output to the .bullet file format or as a Maya scene. The version of Bullet being integrated into Maya leverages more from CPU and GPU to speed up simulation.
Depth of Options
The new Node editor is a cleaner and more sophisticated way of handling the linking of objects to other attributes like materials and rigging effectors. Rather than hooking connections through the Hypershade, with it tangled lines of inputs and outputs, the Node Editor offers a more elegant way of snapping attributes together in less cluttered environment. Nodes can be placed on the board by selecting them out of the viewport/hypershade or by typing straight into the Node Editor after hitting tab. Once on the board they can be pinned down if your planning on moving items outside the Node Editor. Familiar operations like selecting input/output connections, clearing the window, and deleting the node can be found at the top of the interface. As for connecting and disconnecting attributes, it is as simple as dragging on or off the input/output plugs located on either side of a node attribute. Working in the Node Editor seems far more user-friendly and I hope they can make it a viewable option within the Hypershade for the nodes themselves.
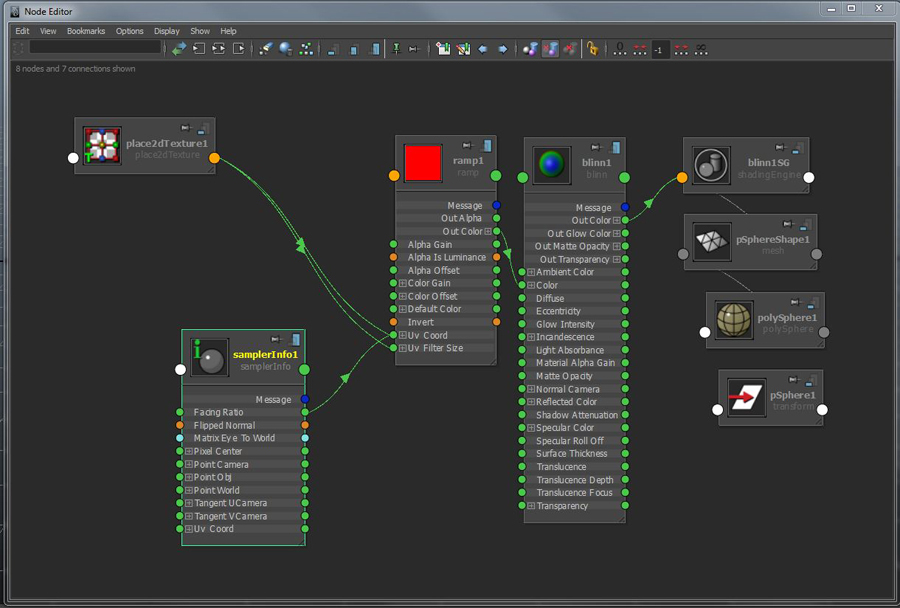
Past users of Maya will really appreciate the clarity of connections the Node Editor offers as opposed to working in the traditional Hypershade and it’s tangled web of links.
File referencing has gotten much more convenient now that it can be done from the Outliner. Referencing files is great for a team environment in which artists can all use a referenced copy of an important asset to continue working while one person updates the parent file. In past versions, those files could only be imported through the Reference Editor, but now within the Outliner, you can convert, export, load, reload, and remove referenced assets quickly and efficiently.
Performance
Pipeline Cache feature leverages the Alembic file format to handle huge amounts of 3D geometry in very large Maya scenes. Spearheaded in 2010 by Sony Pictures Imageworks and ILM to create a comprehensive file format for handling heavy scene data, the hope is for this to become as commonly used as the .obj format. The Alembic-based cache adds performance enhancements in the way of faster loaded scenes, better playback of complex animation, and real-time playback of geometry/topology turbulation. When you are exporting the scene, both alembic and GPU-optimized caches can be saved in the .abc file extension to be opened again in either Maya or third-party applications.
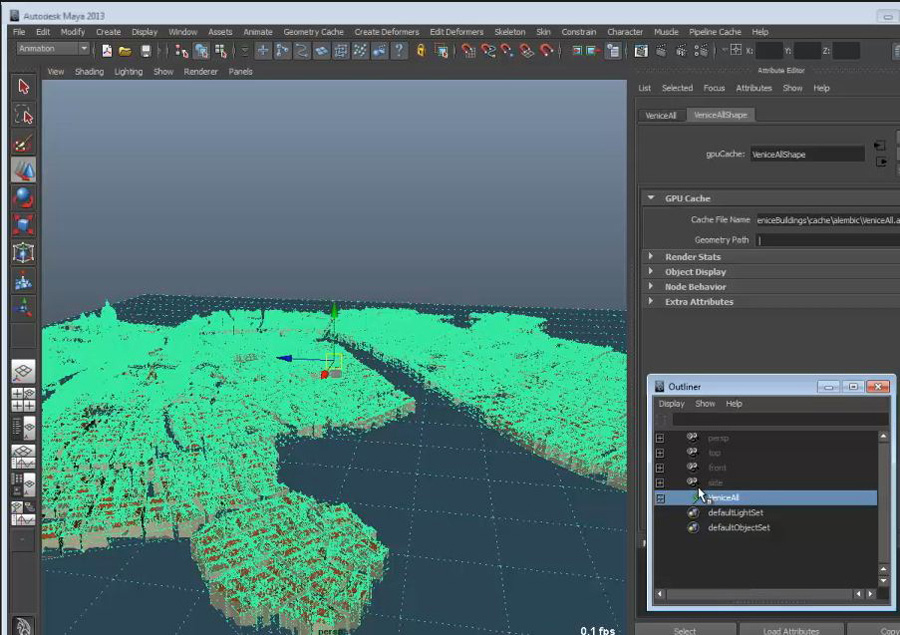
The Alembic cache format handles heavy scenes with a high polycount so that artists can a faster response when working with a few editable assets.
Many new options have been made available within Viewport 2.0. Aids to animation and rigging are now supported, such as ghosting, motion paths, playblast, HumanIK, and joints. More render nodes can be previewed in the viewport which include layered shader, ramp shader, and the new Mandelbrot shader that makes fractal shaped textures in 2D and 3D. Different features for polygons, Nurbs, and dynamics can be displayed to help artists diagnose their meshes. Lastly, performance while moving through a large scene or working with a complex animation, performance has been improved for better results while operating in this mode.
Value
Maya 2013 brings a lot of great features that particularly benefit a production team more than a single user. There are a few new tools, but to a person working on their own, it won’t completely revolutionize how you create your work. That being said, if you’re working with more people, this version of Maya offers great tools to optimize handling big scenes and sharing assets with teammates.
Final Comments
Autodesk Maya 2013 has a lot of great features that support the addition of a Virtual Production environment. Faster rendering of captured animation data, quicker loading of heavy digital environments, and higher quality preview of Viewport 2.0 is a great way to kick off the new initiative. This version of Maya will be more of an advantage to a film crew or microbudget filmmaker. Whether you’re a large production house or a small group of indie filmmakers, it’s a good idea to get familiar with these tools and build on this innovative trend for digital immersion, especially if you intend to make forays into stereography. Looking at this latest installment makes me excited to see future developments for Autodesk Maya when it comes to making Virtual Production a mainstay in the filmmaking community.
|
Breakdown
|
|
|
Ease of Use
|
9 |
|
Depth of Options
|
10 |
|
Performance
|
9 |
|
Value vs. Cost
|
8 |
|
Overall Score |
9 |

2 Comments
Can you advise me whether a new off the shelf iMac can run maya 2013?
Maya is always behind on compatibility of new Macs.
To be honest, I’m not entirely sure. The last couple of years I’ve been working in the PC environment for Autodesk products. When I did work on Mac with Maya, I didn’t have any issues getting it to work. If I had to make a guess, I would say that if the trial version worked on your iMac, the full version should be the same experience.